Cultilene Smart Root Zone Management
Thanks for using Cultilene SRZM!
A disclaimer applies to the content and use of Cultilene SRZM App. By using Cultilene SRZM App you accept this disclaimer.
Before fruits are set on the plant it is possible to be more aggressive with water content control and EC. This will vary of course on variety, rootstock and location. It is the change in water content which is the generative action so the bigger the drop between waterings, the more generative the action.
60% is the water content the cubes should be re-wet to. If the water level is too high they take longer to dry out so the generative effect is less.
Allow the WC to drop by at least 30% between waterings. It is important to measure at least 10 cubes per valve to also look at the standard deviation which can also be a trigger for putting on water. Small shots should be used (dose Size factor 20 or smaller if possible depending on the accuracy of the dripper system). Night waterings can be used during this period as long as the WC drop during the day is no more than 30%.
A high EC is also a generative action as it limits water uptake by the plant. An EC level of 5 to 8 is a guide level and will vary with variety and location.
The difference between the drip EC and the cube EC. Sudden changes in EC will give a sudden change in water uptake so a sudden decrease in EC will be a vegetative action so should be minimized.
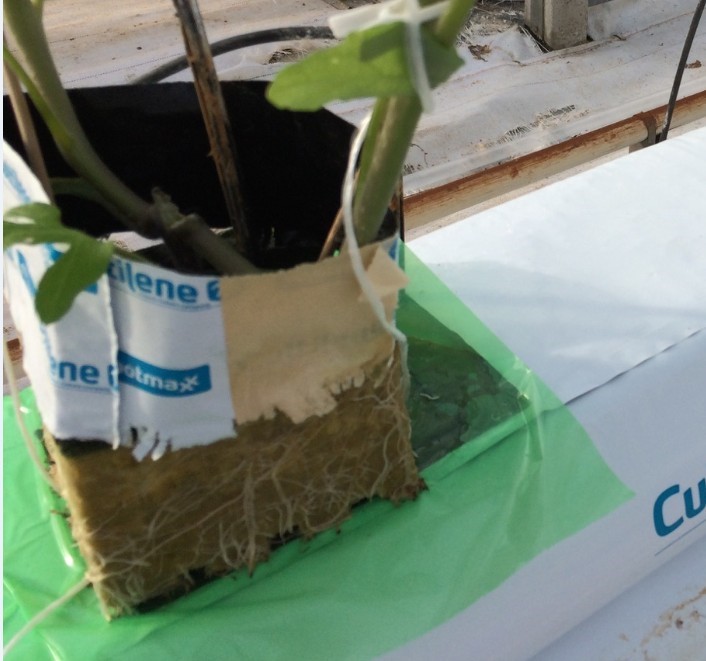
During this phase the roots are still only in the cube so the influence on temperature by the irrigation water can be large. To avoid a shock to the roots the irrigation water should be between 18 and 25 °C. Take care especially with water in outside resevoirs in the winter where the water temperature can be very low.
Please note that these can only be default or rough guidelines because of the large variation of varieties, rootstocks, glasshouse and locations. The objective is to cleary define the periods and to set target levels to suit your own situation.
To get the best production, quality and disease resistance from a tomato crop it is important to get the right plant balance between vegatative and generative growth. The climate in the glasshouse is widely used to try and control this but when planting in short days and low light levels it is important to use as well a higher EC level and restrict the water to steer the plant in a generative way. The more naturally vegetative the variety is the more important this becomes.
| Light intensity | High Gen |
Low Veg |
| WC Drop between waterings | Big Gen |
Small Veg |
| EC | High Gen |
Low Veg |
This plant at this stage has no fruits to hold it back so it will want to grow in a vegatative way so it needs to be controlled to make sure it produces a strong first truss which will set fruits easily even if light levels are low.

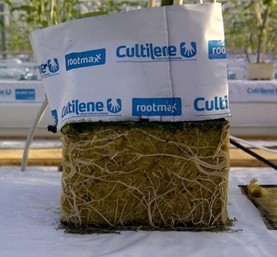
In this way the plant speed can be maintained without losing plant balance. The best way to do this is by allowing the water content to drop as much as possible between each watering. This will steer the plant in a more generative way. Also a high EC >5 will also control uptake and be a generative action. A generative plant will also produce a generative root system which is smaller and more efficient. A vegetative plant will produce a bigger thicker root system which will have to be planted earlier. The more dry back the cube the larger the variation will become around the glasshouse. This means the bigger the plant, the faster the dry back and the more important the measuring. A generative plant will have a harder more 'woody' stem which will be more resistant to Botrytis later in the crop.
Remember every watering is a vegatative action so there needs to be a reason for it!
Yes as soon as the plants are placed out onto the slabs beside the hole put on a round of water at an EC>3.8. This will even up the water content and EC in all of the cubes around the glasshouse. This makes sure that everything is even before you start your watering strategy. Make sure that you have run and checked the dripper system before to make sure that there is no cleaner left in the system and that the EC levels and dose size are correct. This is normally done when wetting up the slabs. Also watch out that the water temperature >15c and ideally >18c.
To try and make the distribution of the irrigation water in the substrate as even as possible it is good to make sure that the drippers are positioned in the same place and at the same depth in every cube. If a dripper hole is used then place the dripper in that and if a donut ring is used make sure that all the drippers are placed in the same position in the donut ring. It is worth doing this job correct as the dripper will stay in this position for a long time and will influence the distribution of the water in the slabs. If there is any slope sideways on the slab and cube (which is not good!) make sure that the dripper in put into the high side of the cube. All of these things are pieces of SRZM which when added together give you the homogeneity and control over your substrate.
It is important to consider what effect each application of water has to the crop balance. Because of the large target dry-back of the cube during this phase of up to 30%, the EC in the block can have risen to a high level. This means that when you apply water the plant will take up this water very rapidly as it will have a lower EC level. This sudden increase in uptake is a vegatative action which is increased the more active the plant is. It is therefore logical to water at night when the plant is evaporating water and not transpiring if you are looking for a generative action. This is always a discussion and it is also linked of course to the plant balance achieved. This also gives the water a chance to 'mix' with the water in the cube so when transpiration starts the next morning the change is less sudden. It is important that as always frequent measurements are taken during the day to check the rate of water content drop in the cube so that the drop in water content does not become too big and dry out the cube.
When it becomes necessary to irrigate during the day to avoid the drop in water content becoming too big, try and irrigate in the morning so the cube has a chance to dry back before sunset.
Because of the small volume of the cube it is logical to use a small dose size. The smaller the dose size, the better to limit the amount of root growth at the bottom of the cube and to limit the amount of drain.
Start with 100mls per dose and then check the accuracy.
The smallest dose size you can use is limited to 2 factors:
Once you have checked these factors try with a 100ml dose and check the accuracy around the glasshouse. There should be no more than 10% variation between drippers. Reduce or increase the dose size until this is achieved.
If the dose size required maintaining this accuracy is greater than 150ml then you need to look, check your system or drippers.
Four ways are commonly used:
Part of the principles of the Cultilene Framework is the importance of setting target levels, measuring in a constructive way and recording the results. This is important especially on bigger glasshouses. So we will focus on using a WET sensor.
The WET sensor should be pushed into the side of the block with the pins vertical as shown in the picture above on the side away from the dripper. Take care to measure with the pins at the same height. Take at least 5 readings per irrigation section taking care to measure the ends of rows (or the extremes) as well as the middle of the rows. This is a critical phase and it is really worth spending time to do this to avoid watering 'just to make sure'. Take readings at the beginning and the end of the day so that the change can be measured and used to judge when to irrigate according to the target levels. The bigger the plant gets and the more light there is the more often measurements need to be taken. On a big site this job can be delegated to a technician as it really is a critical job during this stage.
TAKE Care!